Wireshark Tutorial
Wireshark
I wouldn't say this is much of a tutorial but rather a quick protocol reference to read results from Wireshark and methods on how to extract data from data streams. The pattern of how to analyze protocols is similar across multiple protocols so if you learn one technique, the variation from the next shouldn't be difficult unless some complicated handshaking is involved like SSL/TLS. This guide should illuminate the common features used and most time spent in Wireshark.
Essentials: Capture Filters
Capture Filters are set before starting a packet capture and cannot be modified during the capture. This is where you set the parameters of which you want to capture data from specific or range of targets. https://wiki.wireshark.org/CaptureFilters
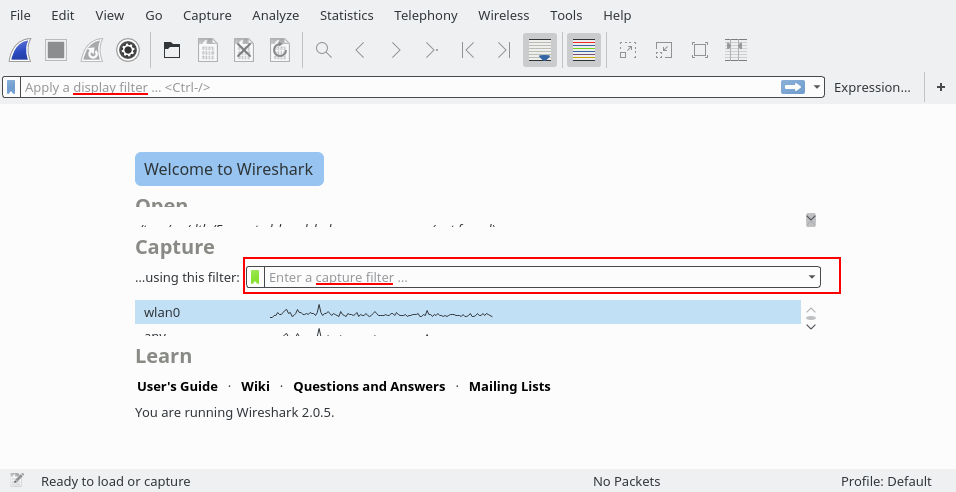
Common examples of what you can do with capture filters:
Capture only traffic to or from IP address 172.18.5.4:
host 172.18.5.4
Capture traffic to or from a range of IP addresses:
net 192.168.0.0/24
or
net 192.168.0.0 mask 255.255.255.0
Capture traffic from a range of IP addresses:
src net 192.168.0.0/24
or
src net 192.168.0.0 mask 255.255.255.0
Capture traffic to a range of IP addresses:
dst net 192.168.0.0/24
or
dst net 192.168.0.0 mask 255.255.255.0
Capture only DNS (port 53) traffic:
port 53
Capture non-HTTP and non-SMTP traffic on your server (both are equivalent):
host www.example.com and not (port 80 or port 25)

host www.example.com and not port 80 and not port 25
Capture except all ARP and DNS traffic:
port not 53 and not arp
Capture traffic within a range of ports
(tcp[0:2] > 1500 and tcp[0:2] < 1550) or (tcp[2:2] > 1500 and tcp[2:2] < 1550)
Essentials: Display Filters
Be aware, this feature is commonly confused with Capture Filter and it's entirely a different feature set. Display Filters are used for general filtering after capturing the network data traffic.
Common examples of what you can do with capture filters:
Show only SMTP (port 25) and ICMP traffic:
tcp.port eq 25 or icmp
Show only traffic in the LAN (192.168.x.x), between workstations and servers -- no Internet:
ip.src==192.168.0.0/16 and ip.dst==192.168.0.0/16
TCP buffer full -- Source is instructing Destination to stop sending data
tcp.window_size == 0 && tcp.flags.reset != 1
Filter on Windows -- Filter out noise, while watching Windows Client - DC exchanges
smb || nbns || dcerpc || nbss || dns
To better understand the basics of how you can filter any type of field items you would like, by selecting any items in the Packet Details section, it will show you the filter ID on the bottom of the window. In the filtering text box, if you sort using the filtering ID as desired, you can use comparison operators to find specific values or ranges.
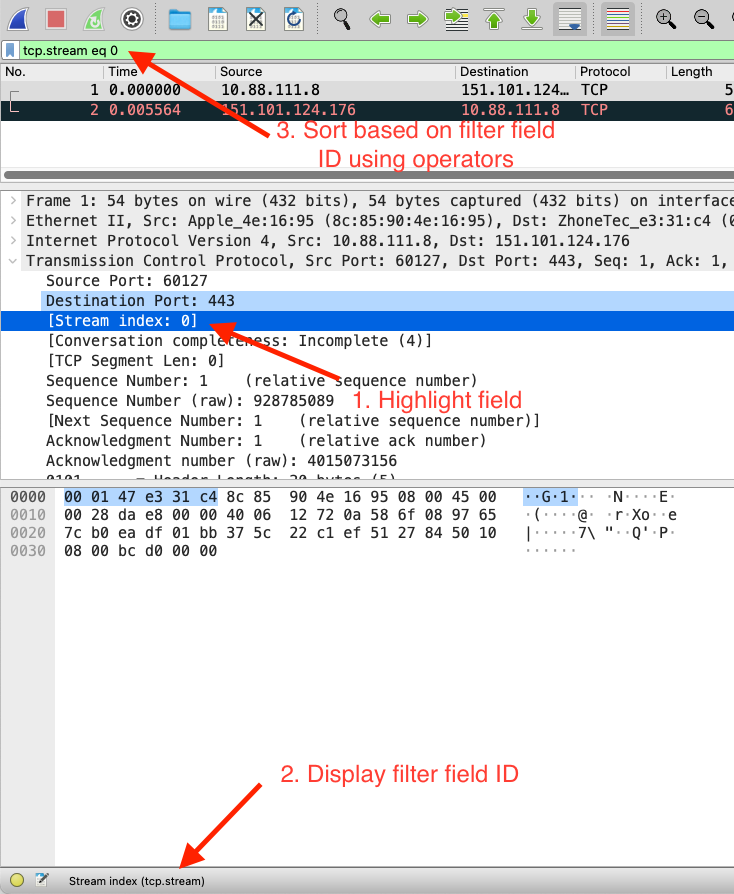
Essentials: Follow the Protocol Stream:
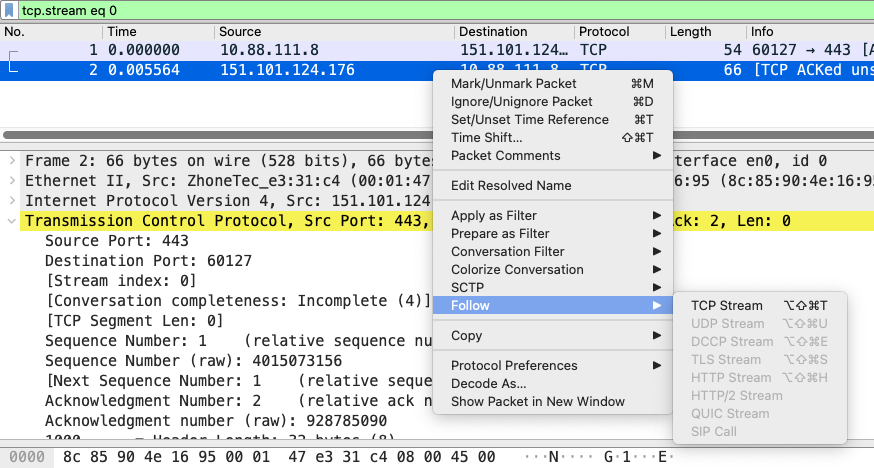
It can be very helpful to see a protocol in the way that the application layer sees it. Perhaps you are looking for passwords in a Telnet stream, or you are trying to make sense of a data stream. Maybe you just need a display filter to show only the packets in a TLS or SSL stream. By following a particular stream, you are able to trace and isolate network traffic for the specific protocol.
Essentials: Export Objects
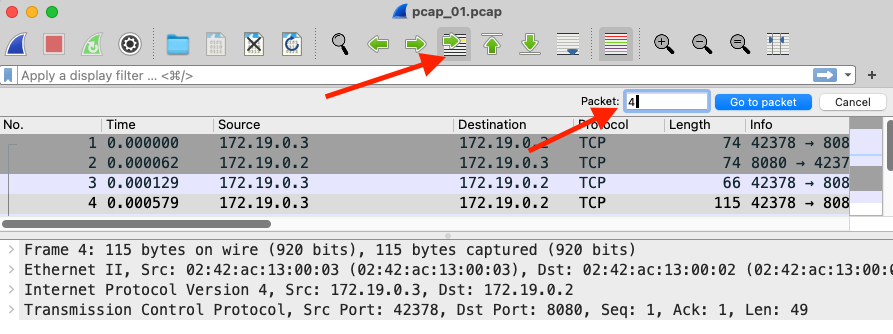
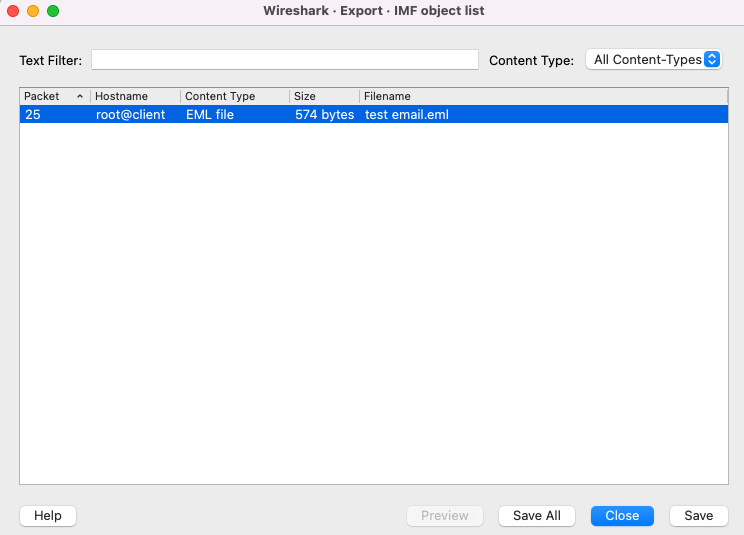
Network traffic can be reconstructed back into readable files without the need for external tools. At times, there are plenty of readable files to sift through and it can be difficult to trace back which protocol stream it belongs to. In order to trace the exported file and the packet stream, take note of the packet number column in the export window. Back to the main window, there is a button to specify which packet you want to view in the packet list.

Telnet
Follow the TCP stream:
........... ..!.."..'.....%..&..... ..#..'..$........!.."..".........%..&..#..$.."...................	..
........................"...... .....'........... .0,0....'.......UNKNOWN............UNKNOWN................!....."........"
Linux 4.9.87-linuxkit-aufs (3413e600e1ec) (pts/0)

..3413e600e1ec login: victim
.victim
..Password: PASSWORD123
.
uname -a
.uname -a
.Linux 3413e600e1ec 4.9.87-linuxkit-aufs #1 SMP Wed Mar 14 15:12:16 UTC 2018 x86_64
.
The programs included with the Debian GNU/Linux system are free software;
the exact distribution terms for each program are described in the
individual files in /usr/share/doc/*/copyright.

Debian GNU/Linux comes with ABSOLUTELY NO WARRANTY, to the extent
permitted by applicable law.
.victim@3413e600e1ec:~$ una.me -a
.Linux 3413e600e1ec 4.9.87-linuxkit-aufs #1 SMP Wed Mar 14 15:12:16 UTC 2018 x86_64 GNU/Linux
.victim@3413e600e1ec:~$
FTP
Follow the TCP stream:
220 0a316eeeb0c3 FTP server (GNU inetutils UNKNOWN) ready.
USER victim
331 Password required for victim.
PASS PASSWORD123
230-
230- The programs included with the Debian GNU/Linux system are free software;
230- the exact distribution terms for each program are described in the
230- individual files in /usr/share/doc/*/copyright.
230-
230- Debian GNU/Linux comes with ABSOLUTELY NO WARRANTY, to the extent
230- permitted by applicable law.
230 User victim logged in.
PWD
257 "/home/victim" is current directory.
FEAT
211- Supported extensions:
 MDTM
 SIZE
 REST STREAM
 EPRT
 EPSV
 LPRT
 LPSV
211 End
HELP SITE
214- The following SITE commands are recognized (* =>'s unimplemented).
   CHMOD   HELP    IDLE    UMASK
214 Direct comments to ftp-bugs@0a316eeeb0c3.
CLNT NcFTP 3.2.5 linux-x86_64-glibc2.13
500 'CLNT NcFTP 3.2.5 linux-x86_64-glibc2.13': command not recognized
PWD
257 "/home/victim" is current directory.
QUIT
221 Goodbye.
FTP: PASV
Follow TCP stream:
220 d18e9e5064da FTP server (GNU inetutils UNKNOWN) ready.
USER victim
331 Password required for victim.
PASS password
230-
230- The programs included with the Debian GNU/Linux system are free software;
230- the exact distribution terms for each program are described in the
230- individual files in /usr/share/doc/*/copyright.
230-
230- Debian GNU/Linux comes with ABSOLUTELY NO WARRANTY, to the extent
230- permitted by applicable law.
230 User victim logged in.
PWD
257 "/home/victim" is current directory.
FEAT
211- Supported extensions:
 MDTM
 SIZE
 REST STREAM
 EPRT
 EPSV
 LPRT
 LPSV
211 End
HELP SITE
214- The following SITE commands are recognized (* =>'s unimplemented).
   CHMOD   HELP    IDLE    UMASK
214 Direct comments to ftp-bugs@d18e9e5064da.
CLNT NcFTPGet 3.2.5 linux-x86_64-glibc2.13
500 'CLNT NcFTPGet 3.2.5 linux-x86_64-glibc2.13': command not recognized
TYPE I
200 Type set to I.
MLST key.txt
500 'MLST key.txt': command not recognized
SIZE key.txt
213 49
MDTM key.txt
213 20180725090145
PASV
227 Entering Passive Mode (172,21,0,2,134,155)
RETR key.txt
150 Opening BINARY mode data connection for 'key.txt' (49 bytes).
226 Transfer complete.
QUIT
221 Goodbye.
Fundamental knowledge when analyzing protocols, if you see a data connection to obtain or read files, chances are there is a second stream of which you can view what is being downloaded or read. You can view the second TCP stream inside the same window of which when you use the Follow TCP stream function.

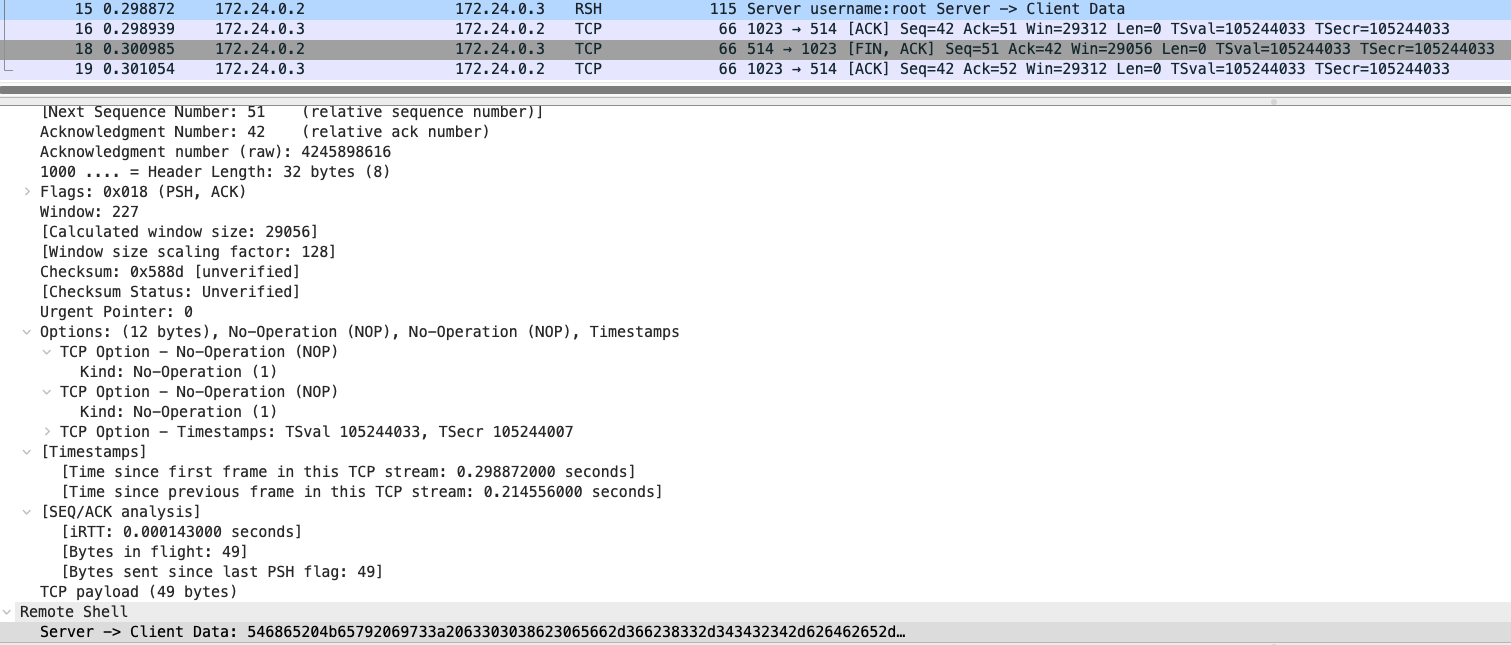
RSH: Reading Client and Server Interactions
Follow the TCP stream:
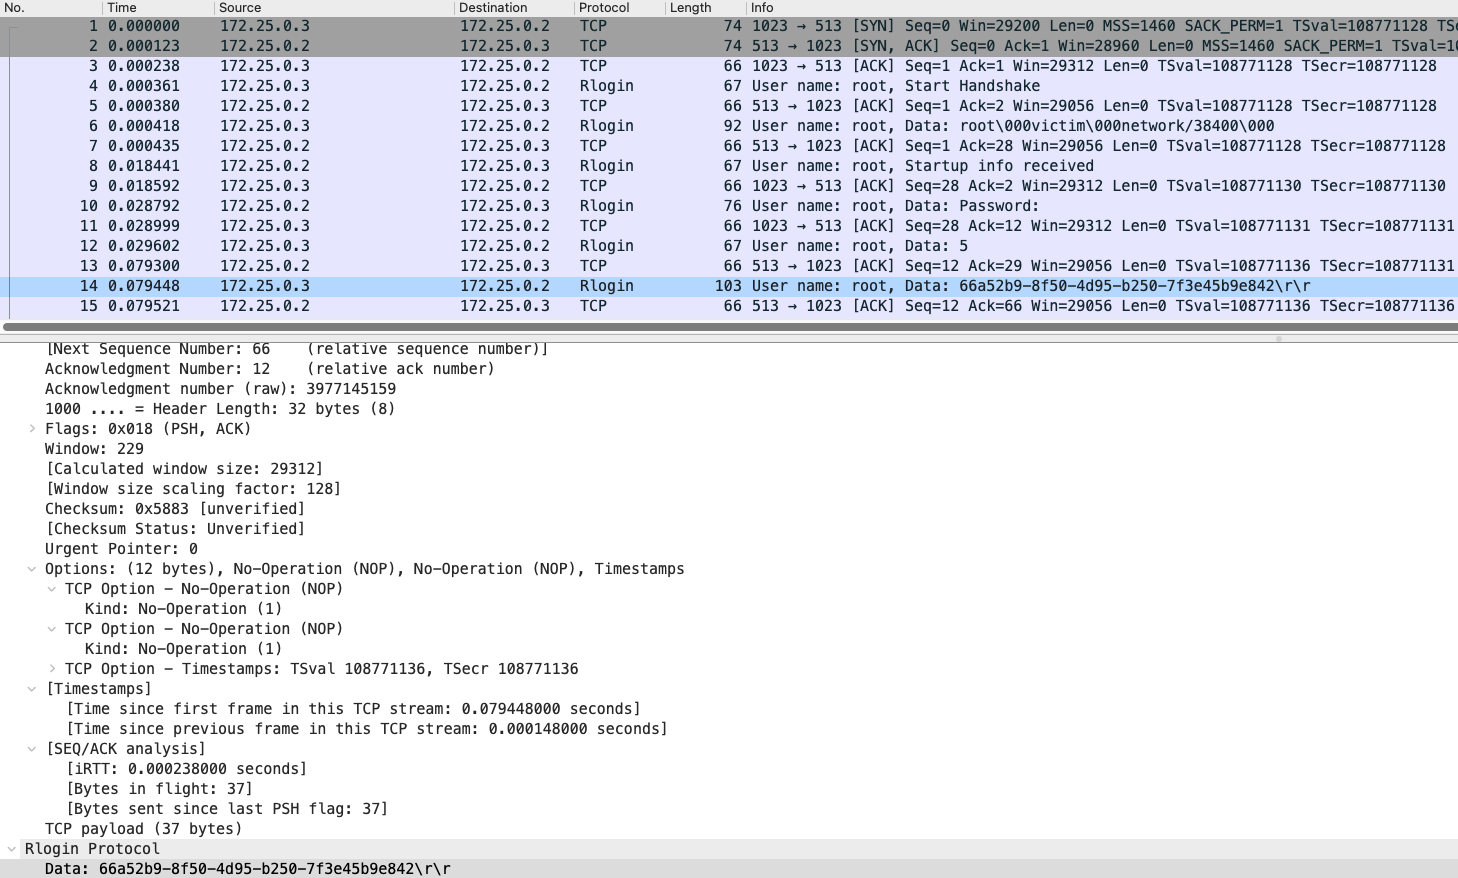
rLogin: Viewing Credentials in Cleartext
Follow the TCP stream:
SMTP
Follow the TCP stream:
220 pcap_08.libcurl.so ESMTP Postfix (Debian/GNU)
EHLO client
250-pcap_08.libcurl.so
250-PIPELINING
250-SIZE 10240000
250-VRFY
250-ETRN
250-AUTH PLAIN LOGIN
250-AUTH=PLAIN LOGIN
250-ENHANCEDSTATUSCODES
250-8BITMIME
250 DSN
AUTH LOGIN
334 VXNlcm5hbWU6
dmljdGlt
334 UGFzc3dvcmQ6
MTVhNjkwYjItYWE0Ni00NzlmLWJjNWUtMzQ0ODE1OGYwNmNl
235 2.7.0 Authentication successful
MAIL FROM:<root@client>
250 2.1.0 Ok
RCPT TO:<root@server>
250 2.1.5 Ok
DATA
354 End data with <CR><LF>.<CR><LF>
Received: by client (sSMTP sendmail emulation); Tue, 31 Jul 2018 06:30:43 +0000
From: "root" <root@client>
Date: Tue, 31 Jul 2018 06:30:43 +0000
To: test@testlab.com
Subject: test email

hello world!
.
250 2.0.0 Ok: queued as AE4254277D
QUIT
221 2.0.0 Bye
Decode the base64 values to reveal the string:
echo 'VXNlcm5hbWU6' | base64 -D
SMTP: Email Zip Attachments
Follow the TCP stream:
220 pcap_08.libcurl.so ESMTP Postfix (Debian/GNU)
EHLO client
250-pcap_08.libcurl.so
250-PIPELINING
250-SIZE 10240000
250-VRFY
250-ETRN
250-AUTH PLAIN LOGIN
250-AUTH=PLAIN LOGIN
250-ENHANCEDSTATUSCODES
250-8BITMIME
250 DSN
AUTH LOGIN
334 VXNlcm5hbWU6
dmljdGlt
334 UGFzc3dvcmQ6
dmljdGlt
235 2.7.0 Authentication successful
MAIL FROM:<root@client>
250 2.1.0 Ok
RCPT TO:<root@server>
250 2.1.5 Ok
DATA
354 End data with <CR><LF>.<CR><LF>
Received: by client (sSMTP sendmail emulation); Wed, 03 Oct 2018 23:19:57 +0000
From: "root" <root@client>
Date: Wed, 03 Oct 2018 23:19:57 +0000
To: test@test.com
Subject: test email

hello world!
begin 644 attachment.zip
M4$L#!`H``````'VZ0TTBWE0B,````#`````2`!P`=&UP+V%T=&%C:&UE;G0N
M='AT550)``.=3K5;G4ZU6W5X"P`!!``````$`````%1H92!K97D@:7,@.#1E
M,6-F-6,M-V1F.2TT96,Q+3AC8F$M8S8Y,C@W9C(V-#9F"E!+`0(>`PH`````
M`'VZ0TTBWE0B,````#`````2`!@```````$```"D@0````!T;7`O871T86-H
M;65N="YT>'155`4``YU.M5MU>`L``00`````!`````!02P4&``````$``0!8
)````?```````
`
end
.
250 2.0.0 Ok: queued as 07FBE34602F
QUIT
221 2.0.0 Bye
Save the attachment info a file:
vi attachment.zip
begin 644 attachment.zip
M4$L#!`H``````'VZ0TTBWE0B,````#`````2`!P`=&UP+V%T=&%C:&UE;G0N
M='AT550)``.=3K5;G4ZU6W5X"P`!!``````$`````%1H92!K97D@:7,@.#1E
M,6-F-6,M-V1F.2TT96,Q+3AC8F$M8S8Y,C@W9C(V-#9F"E!+`0(>`PH`````
M`'VZ0TTBWE0B,````#`````2`!@```````$```"D@0````!T;7`O871T86-H
M;65N="YT>'155`4``YU.M5MU>`L``00`````!`````!02P4&``````$``0!8
)````?```````
`
end
Decode the data filed using uudecode:
uudecode attachment.zip
The data file is ready to unzip:
unzip attachment.zip
FYI, the other easier method rather than doing it manual is using Wireshark's Export feature:
POP
Follow the TCP stream:
+OK Dovecot ready.
CAPA
+OK
CAPA
TOP
UIDL
RESP-CODES
PIPELINING
AUTH-RESP-CODE
USER
SASL PLAIN
.
USER victim
+OK
PASS mypassword123
+OK Logged in.
STAT
+OK 0 0
QUIT
+OK Logging out.
IMAP
Follow the TCP stream:
* OK [CAPABILITY IMAP4rev1 LITERAL+ SASL-IR LOGIN-REFERRALS ID ENABLE IDLE AUTH=PLAIN] Dovecot ready.
A0001 CAPABILITY
* CAPABILITY IMAP4rev1 LITERAL+ SASL-IR LOGIN-REFERRALS ID ENABLE IDLE AUTH=PLAIN
A0001 OK Pre-login capabilities listed, post-login capabilities have more.
A0002 LOGIN "victim" "mypassword123"
* CAPABILITY IMAP4rev1 LITERAL+ SASL-IR LOGIN-REFERRALS ID ENABLE IDLE SORT SORT=DISPLAY THREAD=REFERENCES THREAD=REFS THREAD=ORDEREDSUBJECT MULTIAPPEND URL-PARTIAL CATENATE UNSELECT CHILDREN NAMESPACE UIDPLUS LIST-EXTENDED I18NLEVEL=1 CONDSTORE QRESYNC ESEARCH ESORT SEARCHRES WITHIN CONTEXT=SEARCH LIST-STATUS SPECIAL-USE BINARY MOVE
A0002 OK Logged in
A0003 SELECT "INBOX"
* FLAGS (\Answered \Flagged \Deleted \Seen \Draft)
* OK [PERMANENTFLAGS (\Answered \Flagged \Deleted \Seen \Draft \*)] Flags permitted.
* 0 EXISTS
* 0 RECENT
* OK [UIDVALIDITY 1538980287] UIDs valid
* OK [UIDNEXT 1] Predicted next UID
A0003 OK [READ-WRITE] Select completed (0.000 secs).
A0004 LOGOUT
* BYE Logging out
A0004 OK Logout completed.
HTTP
What is important about analyzing HTTP protocol is looking at the overall content of the data stream. Look for clues like type of HTTP request, sensitive authorization headers, cookies, parameters, tokens, response body.
Follow the TCP stream:
GET /?key=SENSITIVE_TOKEN HTTP/1.1
User-Agent: curl/7.38.0
Host: server
Accept: */*

HTTP/1.1 200 OK
Etag: 103f70-8-5b7a70d6
Content-Type: text/html
Content-Length: 8
Last-Modified: Mon, 20 Aug 2018 07:42:14 GMT
Server: WEBrick/1.3.1 (Ruby/2.1.5/2014-11-13)
Date: Mon, 20 Aug 2018 08:05:31 GMT
Connection: Keep-Alive

Welcome
Authorization header example:
GET / HTTP/1.1
Authorization: Basic YWRtaW46NjhiZGFiMzAtZmJmNy00Njc5LTgxZWMtZDBmOGM2MTNhNGMy
User-Agent: curl/7.38.0
Host: server
Accept: */*

HTTP/1.1 200 OK
Host: server
Connection: close
X-Powered-By: PHP/5.6.38-0+deb8u1
Content-type: text/html; charset=UTF-8

<html>
  <head>
    <title>Welcome to TestLabs</title>
  </head>
  <body>
    <h1>The key is not here!</h1>
  </body>
</html>
Decode the Authorization header by using base64:
echo 'YWRtaW46NjhiZGFiMzAtZmJmNy00Njc5LTgxZWMtZDBmOGM2MTNhNGMy' | base64 -D
JWT header example:
GET / HTTP/1.1
User-Agent: curl/7.38.0
Host: server
Accept: */*
Authorization: Bearer eyJhbGciOiJIUzI1NiIsInR5cCI6IkpXVCJ9.eyJteV9rZXkiOiIxYzRiNzQ5My0wODZkLTQ4MDUtYTY3Yi1kMjRkMmQ3NjBkODIifQ._OFtLxzAf72yb0xlud0wYlEQMPWXw5szxDIKhiW0yIw

HTTP/1.1 200 OK
Host: server
Connection: close
X-Powered-By: PHP/5.6.38-0+deb8u1
Content-type: text/html; charset=UTF-8

<html>
  <head>
    <title>Welcome to TestLabs</title>
  </head>
  <body>
    <h1>The key is not here!</h1>
  </body>
</html>
Decode the JWT token using jwt-cli tool:
jwt decode eyJhbGciOiJIUzI1NiIsInR5cCI6IkpXVCJ9.eyJteV9rZXkiOiIxYzRiNzQ5My0wODZkLTQ4MDUtYTY3Yi1kMjRkMmQ3NjBkODIifQ._OFtLxzAf72yb0xlud0wYlEQMPWXw5szxDIKhiW0yIw
HTTP: Follow TCP Stream vs HTTP Stream
This is what the output would look like when you follow the TCP stream:
GET / HTTP/1.1
User-Agent: curl/7.38.0
Host: server
Accept: */*
Accept-Encoding: gzip

HTTP/1.1 200 OK
Host: server
Connection: close
X-Powered-By: PHP/5.6.38-0+deb8u1
Content-Encoding: gzip
Vary: Accept-Encoding
Content-type: text/html; charset=UTF-8

..........5.A
. .D.=...$j...O.E...5~1.$..Mn_S....{....w...}<C.4SA..2m..mp..p'|.|.].O..C6l...Y.GFx....q2..Q....)..fL.Y..s.*.A^.H4a......4.Q.....
As you can see, the stream is not decoded correctly as this is a display of a ASCII format. In order to read the body of the HTTP packet, you need to
follow the stream as HTML instead and it would detect the Content-Encoding type and decode accordingly:
GET / HTTP/1.1
User-Agent: curl/7.38.0
Host: server
Accept: */*
Accept-Encoding: gzip

HTTP/1.1 200 OK
Host: server
Connection: close
X-Powered-By: PHP/5.6.38-0+deb8u1
Content-Encoding: gzip
Vary: Accept-Encoding
Content-type: text/html; charset=UTF-8

<html>
  <head>
    <title>Welcome to TestLabs</title>
  </head>
  <body>
    <h1>The key is MYPASSWORD123</h1>
  </body>
</html>
The more difficult way to do this is follow the TCP stream as usual, convert the content type as RAW instead of ASCII and save the file as .gz
because the Content-Encoding type. Manually extract the .gz file afterwards. As an example, this method can be performed for Content-Encoding: deflated:
GET / HTTP/1.1
User-Agent: curl/7.38.0
Host: server
Accept: */*
Accept-Encoding: deflate

HTTP/1.1 200 OK
Host: server
Connection: close
X-Powered-By: PHP/5.6.38-0+deb8u1
Content-Encoding: deflate
Vary: Accept-Encoding
Content-type: text/html; charset=UTF-8

x.5.A.. .E..b<..%...p...L\C..FZ.;..^*..??....Kv'....#..3grO.cY....V...}..vm>....P...S....E;....'....'/..R .%.........U.7a........-
Keep in mind, the difference between gzip and deflate is the way it compresses the data. deflate uses zlib which will require a header to
reconstruct the file:
vi data
x.5.A.. .E..b<..%...p...L\C..FZ.;..^*..??....Kv'....#..3grO.cY....V...}..vm>....P...S....E;....'....'/..R .%.........U.7a........-
Now we need to insert the zlib header for gzip to recognize the file for extraction:
printf "\x1f\x8b\x08\x00\x00\x00\x00\x00" | cat - data | gunzip
DNS: Reading DNS Queries
To read DNS queries, select the DNS protocol captured, in the Packet Details window, there is a Queries dropdown menu of which will display the DNS
query types and the answer provided from the server. Keep in mind, DNS queries can also be sent using TCP so keep an eye out for those data streams when identifying DNS
protocols.
DNS: Predictable Transaction IDs
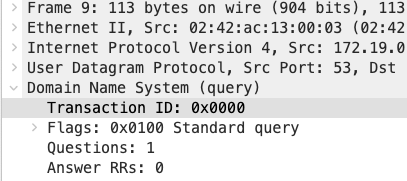
There is an old attack called "Birthday Attack" of which forged DNS response queries with predictable transaction ID is sent to the client before the real DNS
response is received. To analyze the DNS transaction ID, select the DNS packet and view the Packet Details window, select the Domain Name System (query) dropdown to view the Transaction ID field. If the ID starts with 0x0000, there might be a chance that the next packet sent is
predictable. View the pattern from the rest of the DNS data stream to try and identify a sequential pattern by converting the hexadecimal to decimal. Be aware, this attack doesn't commonly
found with the exception of IoT and legacy devices.
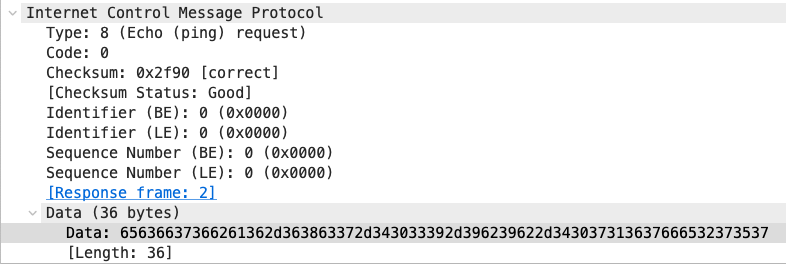
ICMP: Finding covert data
ICMP protocols can be used as a covert channel to send information from one system to another without raising alarms.
TLS 1.2: Identifying Certificate Names
Client TLS connections perform a handshake with a server endpoint. Identifying the certificate used in the handshake process can reveal information about the server being established by the client. This is good for tracing encrypted communication and perform additional reconnaissance.

TLS 1.2: Server Name Indication (SNI)
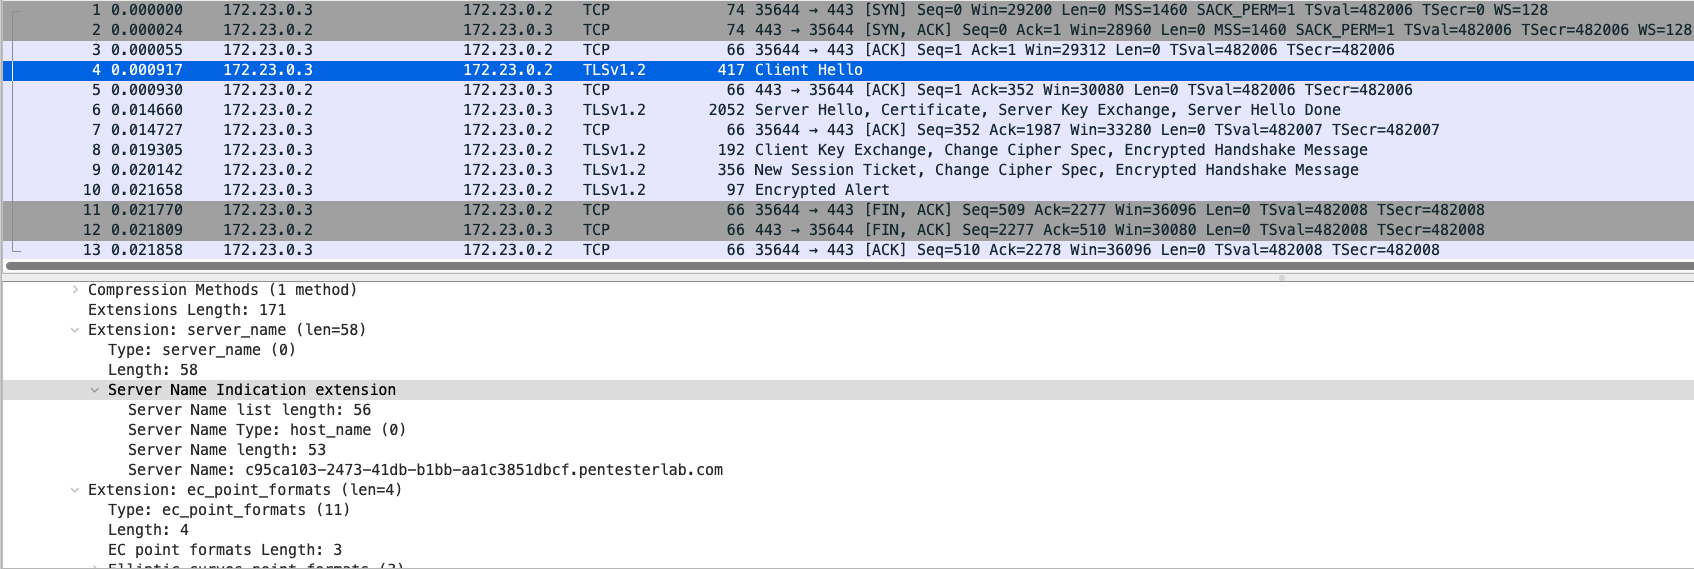
Like a HTTP server, using HTTP headers can indicate where responses are being sent and the responses received. When TLS is applied to the HTTP request, the HTTP headers do not get initiated until the TLS connection is established first. This is where exploration of TLS extension called Server Name Indiciation (SNI) is important to learn about.
A single IP may host multiple TLS server on the same port and the server needs to identify what certificate it needs to send to the client. If the server sends the wrong certificate to the client, it will be rejected by the client. The way to indicate the certificate that belongs to which server is using SNI. The client will send a TLS handshake request to the server and the server will serve the certificate being requested. By looking at the TLS packet, you can find where the TLS traffic is being requested by the client.
TLS 1.2: Decrypting using Private Key
Wireshark has the ability to decrypt TLS connections if provided a private key to read the communication. However, this only applies if the connection does not use Forward Secrecy. Forward Secrecy is used to prevent mishaps such as leaked private keys or broken cryptography from being used to decrypt the traffic prior to the compromise to cleartext.

TLS 1.2: Forward Secrecy and Pre-master Key
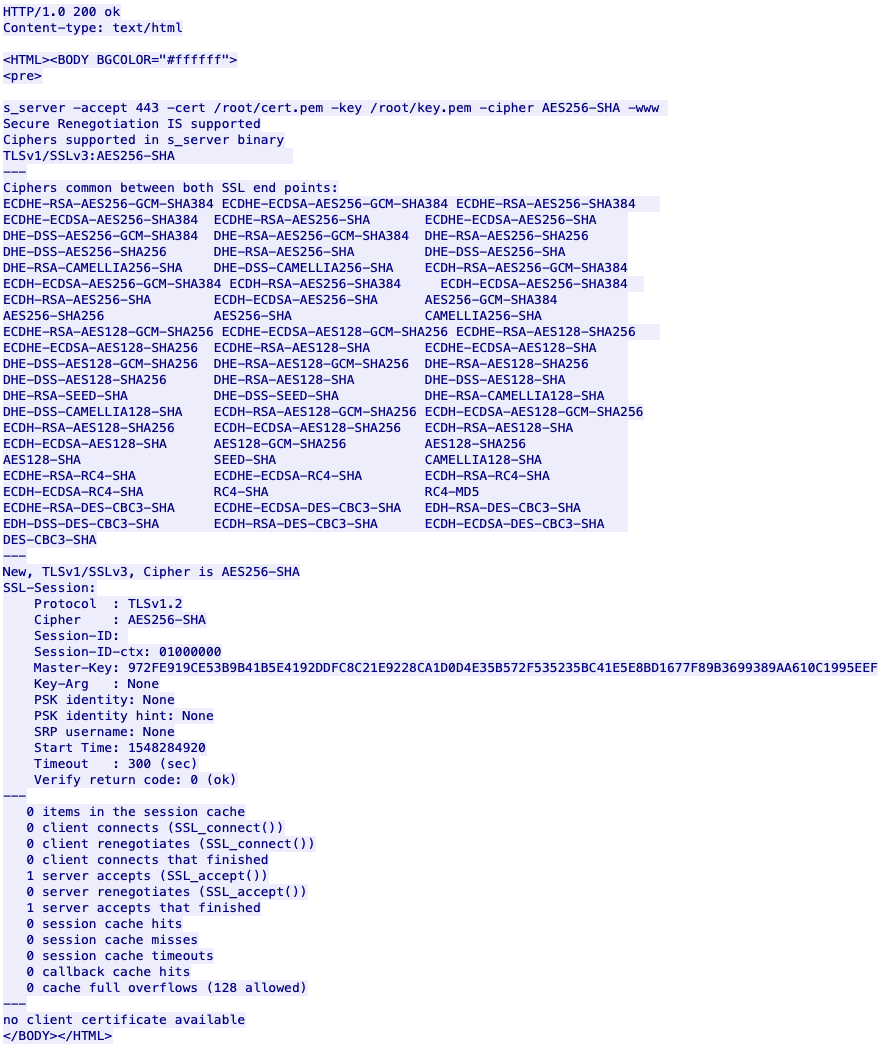
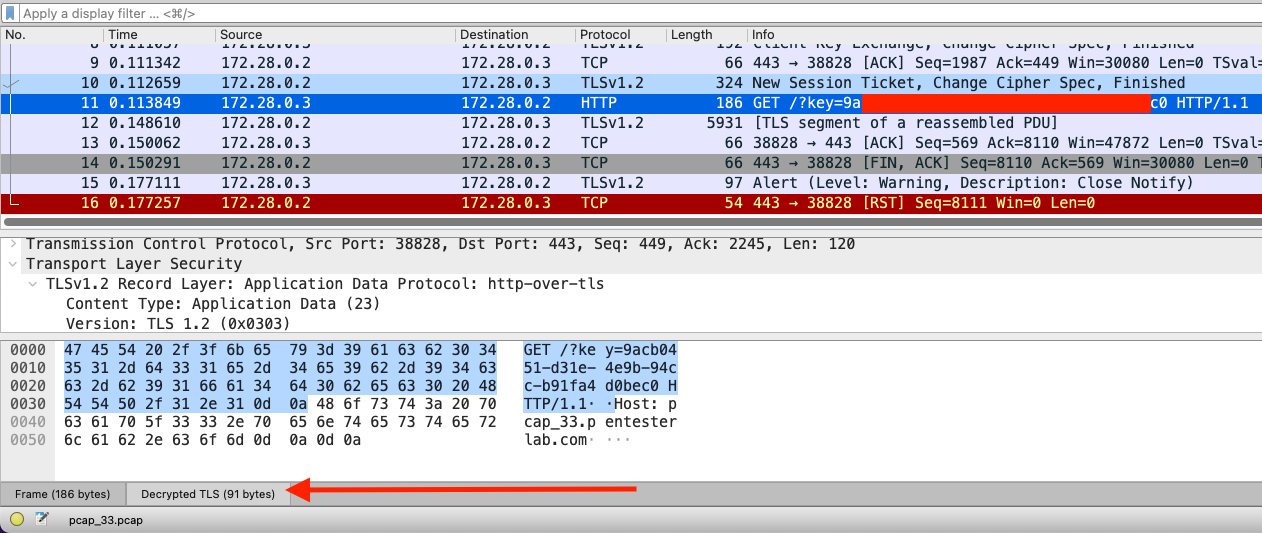
If the captured TLS traffic is using Forward Secrecy, you cannot decrypt the connection with the server's private key. This ensures that if the server's private key is compromised, someone sniffing the traffic prior to the compromise cannot recover the cleartext traffic. However, by modifying the client or the server, it's possible to retrieve the pre-shared key used to secure the communication using premaster key. The premaster key is essentially the two random numbers used in the encryption process between client and server. If you have the premaster key along with the server's private key, you can decrypt the TLS stream using forward secrecy.
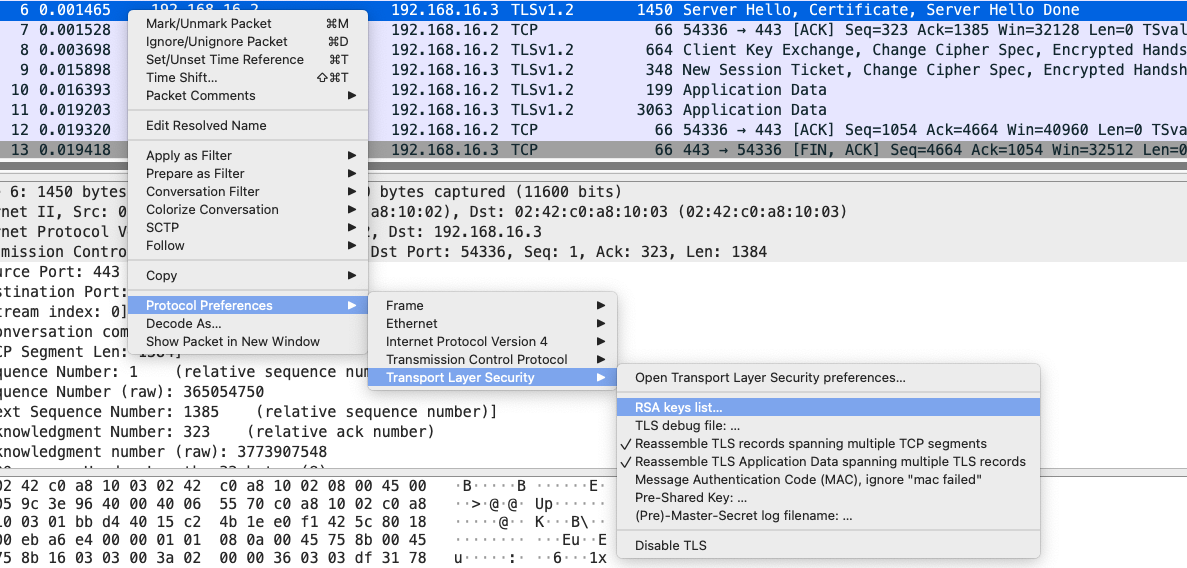
Add the private key to the TLS key settings:


Configure the debug output in order to view the decrypted results. This step will allow you to debug the TLS sessions in play and you can follow play by play with how the TLS session is doing:


Configure the premaster key:

The premaster key file contains the following:
CLIENT_RANDOM 0297ECADDD0596D3BDAFA2439DD9981F830290B9244BB9DF8E518F6078217F85A88112AF1D1BA6661EB48427D880AC182752764D104F1C42608883DFC594991ADFFEB6578311FF97195C061FD1DF1997
CLIENT_RANDOM 0297ECADDD0596D3BDAFA2439DD9981F830290B9244BB9DF8E518F6078217F85A88112AF1D1BA6661EB48427D880AC182752764D104F1C42608883DFC594991ADFFEB6578311FF97195C061FD1DF1997
CLIENT_RANDOM 7D1522A21B103244102DFB4EB1AF935DF3A0A3053D942EEB7A87F9D270AF37C531660A7646F61D5B1ABA597BFC726B53A9C337A2DD0D29684FD48FD3BD0C936EA21D62AB749ED08AADDF5DDB7AEA36DF
CLIENT_RANDOM 7D1522A21B103244102DFB4EB1AF935DF3A0A3053D942EEB7A87F9D270AF37C531660A7646F61D5B1ABA597BFC726B53A9C337A2DD0D29684FD48FD3BD0C936EA21D62AB749ED08AADDF5DDB7AEA36DF

The TLS stream should be now decrypted and you can follow the TLS stream to view the decrypted traffic. Lastly, pay attention to the bottom where an arrow is marked.
MySQL: Login and Password
MySQL request and responses can be read in plaintext only if encryption is not used.
